Gunsmithing Tips

Home/Gunsmithing Tips

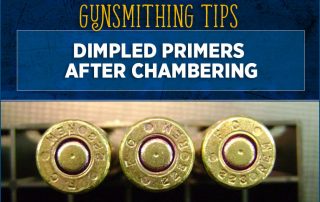
Dimpled Primers After Chambering

Occasionally a customer contacts me with concerns about primers being slightly dimpled upon chambering a round. This is completely normal and is a characteristic of all basic AR15/M16 rifles. The firing pin in an AR15 is free floating inside its chamber. The forward inertia of the bolt upon chambering a round causes the firing pin [...]

2017-01-14T14:07:00-05:00January 10th, 2017|Gunsmithing Tips|

Brass Deflection for Left Handed Shooters firing the CF-15

I have had a few left handed shooters asking me how to more effectively deflect the brass out of our Carbon fiber rifles. Brass is sometimes deflected back at a sharper angle on the Carbon rifles and some left handed shooters have been struck with empty brass. The most effective solution is to use the [...]

2017-01-14T14:07:00-05:00January 10th, 2017|Gunsmithing Tips|

Barrel Steel and Twist Rate

I've had several customers inquire about specifically what type of steel is used in our black phosphate, chrome lined gun barrels. The following should help clarify. Windham Weaponry uses a modified 4150 Vanadium steel, better known as MIL-B-11595E CMV. Some manufactures call this "4150Mod". Our barrel steel is not plain "4150". Described better, it is [...]

2017-01-14T14:07:00-05:00January 10th, 2017|Gunsmithing Tips|

Removing a Blown Primer From Your Lower

This isn't a terribly common occurrence but it does happen from time to time. All of a sudden for no apparent reason you can't pull the trigger or move the safety on your AR15. The hammer is stuck in the cocked position and will not move no matter how hard you try to pull the [...]

2017-01-14T14:07:00-05:00January 10th, 2017|Gunsmithing Tips|

Installation of MFT E-VolV 2.2in. Picatinny Rail

The Mission First Tactical EVolV 2.2" rail allows you to attach a forward pistol grip, flash light - or any other item that mounts to a Picatinny rail - to your stock carbine hand guards very easily. First make sure weapon is unloaded! Then remove upper receiver from lower receiver. Remove handguards by following the [...]

2017-01-14T14:07:00-05:00January 10th, 2017|Gunsmithing Tips|

Installing a Tactical End Plate on a Telestock

Make sure weapon is unloaded! Push takedown and pivot pins out and remove lower from upper receiver. Remove buffer and spring from lower by pushing the buffer retainer down and pulling them out of the buffer tube (as shown on page 25 in your owner's manual). Put lower receiver in a magazine well vise block [...]

2017-01-14T14:07:00-05:00January 10th, 2017|Gunsmithing Tips|

Our Thoughts on Steel Cased Ammunition

Pretty much daily I get the question "Is it okay to shoot steel cased ammo in my Windham Weaponry AR15?" With ammunition in short supply and good ammo priced very high, many people are buying cheaper steel cased, bi-metal jacket ammunition from Wolf, TulAmmo, Herter's, etc. While I don't generally recommend steel cased ammo, it's [...]

2017-01-14T14:07:00-05:00January 10th, 2017|Gunsmithing Tips|

How to Stake a TeleStock Castle Nut

I get asked now and then "Why doesn't Windham Weaponry stake their castle nuts on?" The reason we choose not to is because many people want to upgrade some part of the stock, usually the endplate, and this requires loosening of the castle nut and removal of the stock. It's much more difficult to do [...]

2017-01-14T14:07:00-05:00January 10th, 2017|Gunsmithing Tips|

Installation of an Ambidextrous Safety

For those wishing to install an ambidextrous safety selector, here are instructions on how to properly do so. This is the POF Ambi Safety that we sell in our catalog but most selectors install the same way. If you have a different type follow the manufacturer's instructions. First - Make sure the weapon is unloaded! [...]

2017-01-14T14:07:00-05:00January 10th, 2017|Gunsmithing Tips|

Harris #5 and Bipod Installation Instructions

The following are instructions on how to install a Harris #5 Bipod Adapter and the Bipod on M4 dual heat shield handguards. Make sure weapon is unloaded! Separate upper from lower and remove handguards. First remove the inner heat shield of the handguard that will be used on the bottom of the rifle using a [...]

2017-01-14T14:07:00-05:00January 10th, 2017|Gunsmithing Tips|
Go to Top